
Vinyl siding is one of the most popular exterior materials for homes and for good reason. It’s affordable, durable, and relatively easy to install. Whether you’re a DIY enthusiast or planning to hire a contractor, understanding the vinyl siding installation process can help you make informed decisions.
In this guide, we’ll explain how to install vinyl siding step by step and provide expert tips to ensure your exterior stays beautiful for years.
Why Homeowners Choose Vinyl Siding?
Before diving into the installation, let’s look at a few reasons why vinyl siding is a smart choice:
- Low maintenance: No need to paint or stain.
- Weather-resistant: Handles wind, rain, and heat with ease.
- Energy-efficient: Often installed with insulation to improve efficiency.
- Style variety: Available in various colors and textures to match your aesthetic.
For more info on durability, check out our post on the most durable exterior siding options.
Tools and Materials You’ll Need
Before you start, gather these tools and materials:
- Vinyl siding panels
- Starter strip
- J-channel and corner posts
- Nails or screws
- Hammer or nail gun
- Level
- Measuring tape
- Circular saw or tin snips
- Chalk line
- Safety glasses and gloves
Step-by-Step: How to Install Vinyl Siding
1. Prepare the Wall Surface
Ensure your exterior walls are clean, flat, and dry. Remove any old siding or debris. Install house wrap or foam board insulation for added protection.
2. Install the Starter Strip
Begin at the lowest point of the wall and use a chalk line to ensure a straight line. Attach the starter strip along this line, leaving about 1/4” space at the ends for expansion.
3. Install Corner Posts and J-Channels
Attach corner posts at each corner of the house and J-channels around windows and doors. These channels hold the siding in place and provide a clean, finished look.
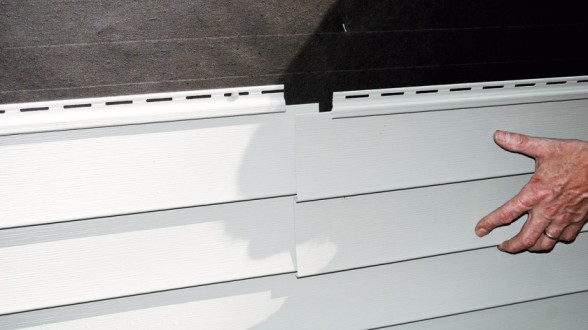
4. Begin Installing Panels
Start with the bottom panel and lock it into the starter strip. Nail it loosely in the center of the nailing slots, allowing for slight movement due to expansion and contraction.
Tip: Never nail vinyl siding tightly—this can cause warping, especially in high-heat areas. Learn more in our guide on what causes warped vinyl siding.
5. Work Your Way Up
Continue locking panels into place and nailing them as you move up the wall. Stagger vertical seams for a more natural appearance.
6. Trim Around Openings
Use utility trim or J-channels around windows, doors, and roof lines. Cut siding panels to fit these spaces snugly but not tightly.
7. Cap the Top
Install a utility trim or J-channel at the top of the wall to receive the final siding panel. Cut the top panel to size and snap it into place using a snap-lock punch tool.
Should You DIY or Hire a Pro?
While installing vinyl siding can be a DIY project, professional installers bring precision, efficiency, and warranty-backed workmanship. Curious about costs? Here’s our breakdown of how much a contractor charges for siding.
And if you’re located in or around Joliet, our expert Joliet siding installers are ready to help.
Style Tip: Boost Curb Appeal with the Right Color Combo
Once your siding is installed, make your exterior pop with perfectly matched shutters and doors. Check out our post on the best shutter color combinations for vinyl siding, brick, and front doors.
Final Thoughts
Installing vinyl siding may seem intimidating, but with the right tools and a bit of patience, you can refresh your home’s exterior and boost its value. Whether you’re tackling this as a weekend project or calling in the pros, understanding the process ensures you get long-lasting, attractive results.
Still have questions? Visit our blog to read more expert insights or contact Will County Siding and Windows for a free estimate today.